The first time you go camping with a tarp can be a game changer – especially if you are caught in the rain or are baking under an intense sun. But a lot of otherwise gung ho outdoors people never bother with a tarp because they feel it is not worth the extra weight in their pack, or they don’t want to deal with the complicated rigging involved in setting up a tarp.
Both of these concerns are complete myths and I am the perfect person to help dispel them. I believed them both for many years until one day, while sitting in the rain trying to start a campfire with sopping wet wood, I looked at the “obnoxious tarp camper” across the river and saw how happy, warm, and dry he was, completely enjoying his rainy camping trip as though there was no rain at all.
The very next camping trip I went on I brought a tarp. It rained on that trip too, but my experience was completely different from the trip before. I will never go camping, or backpacking, without a tarp again.
If you are sold on the tarp idea and are looking for an easy approach to choosing, rigging, and setting up a tarp, I can definitely help. I am not a prepper or survivalist, just simply a guy who wants to enjoy his time outdoors, so I promise to keep this as simple as possible.
A simple and effective tarp setup should not only be easy to setup, but adaptable to a variety of situations. The tarp and rigging should address the shelter needs of the trip, but also any constraints for weight or pack volume.
I should make it clear that in this article we are only talking about tarps being used as general shelter. By this I mean a tarp that is setup in order to offer shade or rain protection when sitting around a campsite, picnic area, or beach setting.
We are not talking about using tarps for overnight shelter or for hammock camping as some of what follows would not be helpful or applicable to those situations.
The Tarp
This is obviously the key component here and the size (and weight) of the tarp must fit the constraints of your trip, yet still provide adequate shelter to be worth bringing along. Beyond being able to shed water and offer shade, what makes a tarp a tarp is attachment points.
Attachment points can be grommets, loops of webbing or string, or metal rings. A small tarp should at least have them on all four corners, but larger tarps (8’ x 8’ and up) should have additional attachment points along the sides and ideally even in the center.
Tarps for Car, Canoe, and Kayak Camping
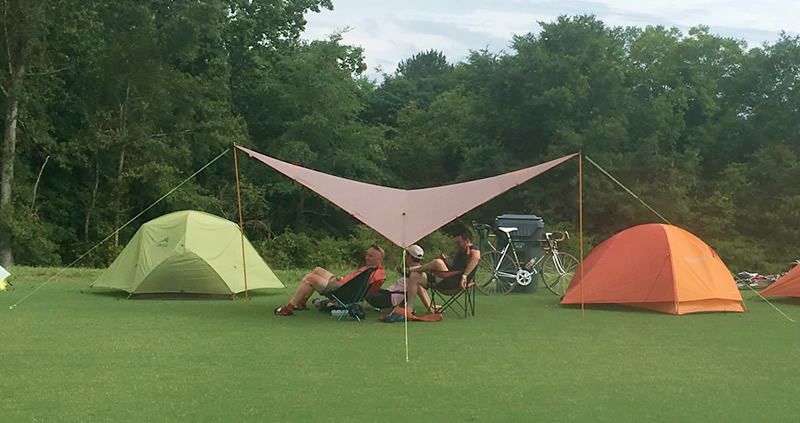
In situations where you can carry more (or heavier) gear, have a larger group of people, and/or are going to be in one location for a long time, you may really appreciate the shelter offered by a larger tarp.
The size range for an adequate tarp in these situations would be around 8’ x 8’ up to 20’ x 20’ or even larger! Tarps over 12’ x 12’ will not only weigh more, but also be much more difficult to setup and catch much more wind – an important consideration if you are relying on your tarp for shelter in a storm.
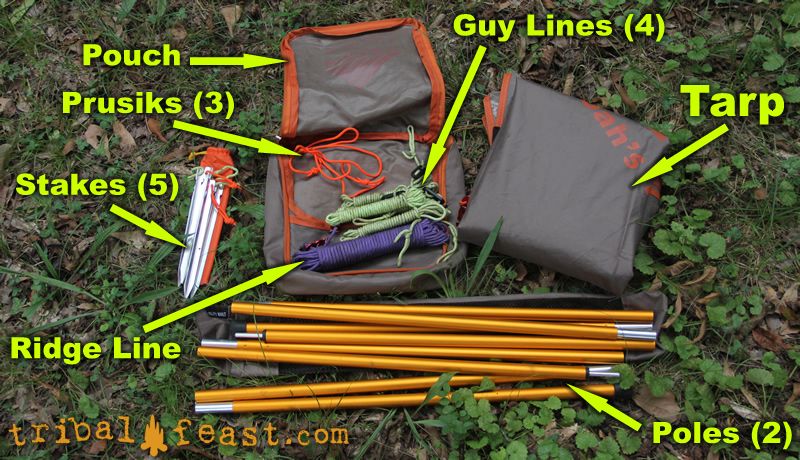
I’ve been using a 9’ x 9’ Kelty Noah’s Tarp 9 for many years and it has been the perfect size to provide shelter for two or three people, yet doesn’t take up too much space in my pack. Depending on how much rigging I’m bringing along (and if I bring poles for it), this tarp setup can weigh just over 2 pounds.
If I needed shelter for a large family or bigger group of people and knew I wasn’t going to be in harsh, windy conditions, I might consider scaling up to a 12’ or 16’ tarp, but anything larger than this can get very unwieldy.
Another issue with much larger tarps has to do with setups in areas with no trees or other structures to tie a ridgeline to (we’ll discuss ridgelines below). In these situations you will need to bring poles. A larger tarp requires more support and may even require a center pole. This can get not only heavy, but very expensive.
In the end, don’t go overboard when choosing what size tarp to buy for car camping or paddle camping. If it is just you and a friend or two, you will find that a 9’ tarp will offer perfectly adequate shelter at minimal hassle.
Tarps for Backpacking and Emergency Shelter
In situations like backpacking, where pack weight and space is severely limited, a 9’ x 9’ tarp would be the upper limit for what you would want to carry. The tarp material will weigh heavily (pun intended) on the size tarp you choose of course. but even with lighter weight materials, a 9’ x 9’ tarp should be considered large.
Most smaller tarps on the market are not square but rather rectangle. The reason for this is that for a smaller tarp, you may want to use it in lieu of a tent or as a shelter for hammock camping and this offers greater coverage for someone lying down. This is a definite plus if you plan on using your smaller tarp as emergency shelter.
An ideal tarp size range for adequate minimal coverage for one person (sitting) with some room to cook or perform some other task would be from about 4’ x 6’ to 6’ x 8’. For two people that range should be increased from around 5’ x 7’ to 7‘ x 9’.
Affecting all these dimensions is of course how the tarp is set up. A canted or A-Frame setup will offer better protection in the wind but much less coverage area, so keep that in mind if you plan on using the tarp in areas with strong winds and rain.
One way to have a larger tarp size yet not be burdened with the weight is to consider a tarp made out of Dyneema (also called Cuben Fiber). This space age material is super light and does not absorb water, but is also extremely expensive. Because of the expense and difficulty in working with Dyneema, you usually have to turn to small cottage industry manufacturers for products. A search online should bring up some current manufacturers.
A cheaper and more convenient solution that I would recommend would be to consider one of the many pocket blankets that are on the market these days. Often these can be purchased for under $30 and are perfect for a micro tarp when backpacking. A great choice here would be the PokiPine Travel Outdoor Blanket.
Tarps for the Beach
If you plan to use your tarp at the beach or an area with sand and wind, there are a few considerations you will want to take into account.
First of all, unless there are trees or some vertical structure to tie a ridgeline to, you will need to purchase tarp poles. A good rule of thumb for choosing a tarp that will be setup with poles, especially in a windy environment, is that you will want to choose the absolute smallest size you can get away with. A bigger tarp means more poles and a much bigger nightmare when the wind kicks up.
Secondly, you will need specialized sand stakes to anchor your tent and you may want to consider using extra guylines and stake off points. You cannot have enough anchor points in the sand!
The Ridgeline
Think of a ridgeline as the main support for your tarp. This one length of line or cord will run across the area you wish to set your tarp up and, like a clothesline, also offer a convenient place to hang clothes, camplights, and other things from.
Choosing a Cordage
The easiest and most readily available cordage to use for a ridgeline is without a doubt 550 paracord. It’s strong, light, and very affordable. It also comes in a near infinite variety of colors and lengths. The only downside to using paracord is that it does tend to absorb water and it is not as light as some newer options available.
If you wanted to get a bit more high-tech, you could go with one of the new Dyneema fiber cords like Zing-It. Dyneema cords are super strong, ultra light, and don’t soak up water. But they are also very expensive and a bit tougher to work with – especially for your first tarp setup. Unless you’re going on an ultralight backpacking trip, I’d recommend sticking with paracord for your first tarp experience.
For smaller backpacking tarp setups, I find that the Nite Ize reflective cord made for guylines is perfectly adequate as a short ridgeline. As an added bonus, it is reflectorized so you can find your way back to camp easily in the dark.
Choosing the Length of a Ridgeline
The length of your ridgeline is best determined by considering the size of your tarp and the possible camping situations you may find yourself in. How far apart will trees or other vertical structures usually be? Keep in mind you also need to add some length of cord for tying off your ridgeline at either end.
Also keep in mind that you may want to have your ridgeline run diagonally across your tarp in some situations. If you had a 9’ square tarp, the diagonal would be nearly 13’. Add in 12’ of line on either side for a run to a nearby tree and to use to tie off with, and you have nearly 40’. This would be a decent length to start off with for a 9’ x 9’ tarp. But if carrying a bit more line wasn’t an issue, I would consider it.
For a smaller backpacking tarp, you may be able to drop down to 30’ for a ridgeline, but keep in mind that the more line you bring, the more flexible your setup will be.
Using a Ridgeline
By attaching your tarp to a ridgeline rather than just attaching lines to the attachment points on either end of your tarp, less strain is put on the tarp material making a more secure setup and prolonging the life of your tarp.
Whenever possible, use a ridgeline and put your tarp on top of the ridgeline. This gives you the added benefit of having a length of rope running through your campsite that is under shelter and makes a great point to hang a few light items of clothing or a small light from.
Situations Where You Can’t Use a Ridgeline
There will be situations when a ridgeline is impractical or impossible. A good example is setting up a tarp in a field with poles. In this situation, the tarp acts as its own ridgeline and tension is provided by guylines. As mentioned above, this puts much more stress on the tarp, so use a ridgeline if at all possible.
Toggles, Runners, and Prusiks, Oh My!
The main takeaway you need from all these terms is that they all simply refer to different ways to attach your tarp to your ridgeline. This is actually not complicated at all, but happens to be the area where tarp rigging can get overly creative.
I recommend keeping your tarp setup very simple when you are starting out and sticking with a simple toggle to attach your tarp to your ridgeline, but I’ll touch base on the other options just so you have some choice.
Toggles
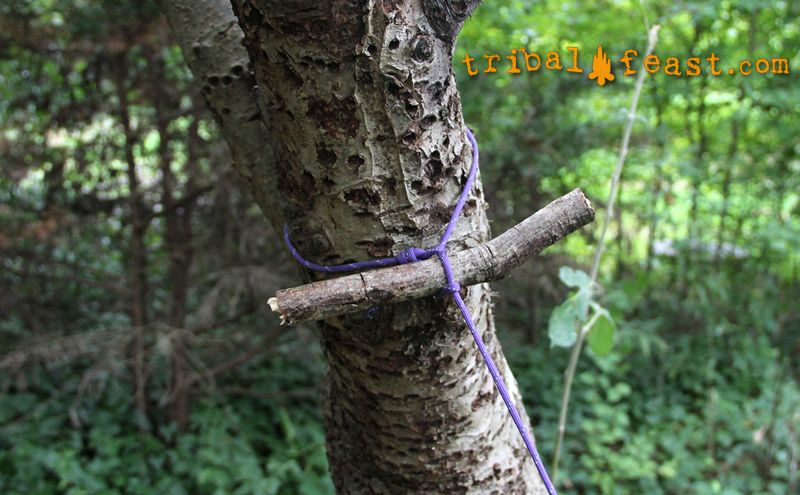
This is far and away the easiest way to attach your tarp to your ridgeline and is also an awesome way to anchor one end of your ridgeline to a tree. Basically, you make a loop in the ridgeline, stick it through the attachment point on the tarp, and then stick a piece of wood or a tent stake through that loop. Fast, cheap, and easy!
Runners
There are many different terms for these little devices, but I’ve always known them as runners. They are really nothing more than a small piece of metal or plastic that attaches permanently to your tarp and allows you to quickly attach your tarp to your ridgeline.
Not only is this approach inexpensive, but also you can attach the runners in such a way that you can still use another method like a toggle to attach your tarp should the runner fail – and I have had them fail.
My favorite runner design is these I got on Amazon. They’re made from aluminum and attach permanently to the tarp. They then clip to the ridgeline via an s-shaped design. Simple with no moving parts! With this setup you have a number of options and can still use the attachment point sewn onto the tarp.
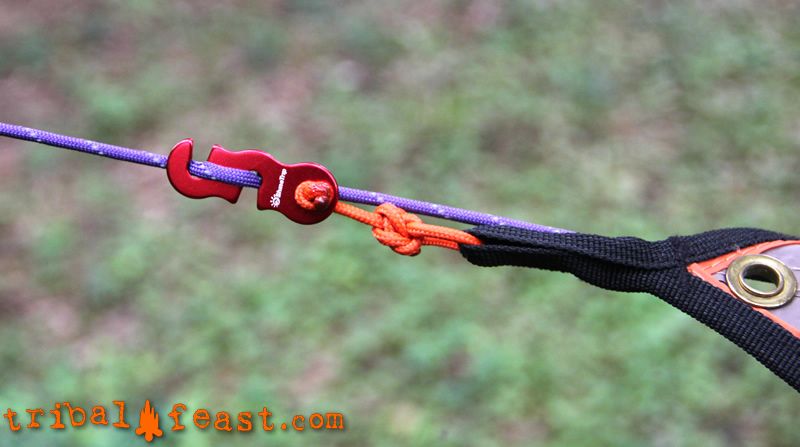
Prusiks
A prusik is basically a circle of cordage that loops on itself to create a friction hitch that tightens up under pressure and can slide when that pressure is let off. Prusiks are super simple to make and use, but they still require you to have some way to attach your tarp to the prusik loop.
One of the best ways to do this ironically, is with a toggle. In situations where your ridgeline needs to be under a lot of tension, create a prusik loop and stick it through the attachment point of your tarp. Then put a tent stake or stick through the prusik loop.
Prusiks are also a very handy way of hooking lanterns and other things to your ridgeline beneath your tarp setup.
Guylines
A guyline is simply a length of cordage running from a side or corner of your tarp to a stake or similar anchor point on the ground. Not only do they keep the tarp from flapping around in the wind, but they also give the tarp setup tension and help control its shape.
Do You Need Guylines?
If you set up your tarp in a super low profile A frame configuration right on the ground, you wouldn’t need guylines. Instead you would stake the tarp corners directly into the ground. You would also have to crawl on your belly to get beneath your tarp.
Conversely, if you were setting your tarp up so that you could walk easily beneath it, you would need fairly long guylines to put tension on the tarp with it being elevated so high (above your head).
If you were setting your tarp up in a field with poles so that is was free standing, guylines will be the only thing that puts tension on the tarp setup and you will most always need them at all four corners.
The tl;dr here is that you should always carry four guylines to make sure you always have what you need and to help you with tarp deployment in tough situations.
Choosing Cordage for Guylines
Guylines do not need to be as strong as your ridgeline. Remember that there may be as many as four or more guylines putting pressure on your tarp or ridgeline, so if something was to fail in a sudden gust of wind, you want it to be a guyline.
Using 550 paracord as a ridgeline, I find the ideal cordage for guylines is the Nite Ize reflective cord mentioned above. It is very strong, yet has much less diameter and weight than paracord, so it doesn’t take up much room in your tarp bag. Also, because guylines are so often tripped over, reflective cord makes a big difference when navigating your campsite in the dark with a flashlight.
If you are on a tight budget, I’d suggest rooting around in your camping gear junk box and see if you already have some guylines laying around. A lot of tents come with guylines and slide adjusters and quite often people will just toss them in their junk box since they don’t plan on using their tent in a storm. A big mistake by the way! Learn how to use guylines on your tent and always carry them!
Length of Guylines
The length of your guylines is mostly dependent on how high you like to suspend your tarp off the ground and the angle of the guylines. Needless to say, there is quite a bit of variability here.
To cover a variety of situations, including setting my tarp up with poles in a field, I usually carry 4 guylines of around 14′ in length with slide adjusters to quickly and easily shorten them.
Sliders or Knots
Slide adjusters (also called cord tensioners) are a great way to quickly change the length or your guylines and to apply additional tension without moving a stake in the ground. Aluminum alloy sliders are considerably nicer to use than plastic, but both are perfectly adequate.
There are a wide variety of slider designs on the market and because they are so cheap, you may want to try a few types out before you find what works best for you.
You can also go completely without them and instead opt for using knots like a trucker’s hitch or taughtline hitch. Talking about knots is opening a huge can of worms, so to keep things simple, I’d recommend sticking with sliders until you get the hang of your tarp setup – then trying out different knots on subsequent trips.
Attaching Guylines to Your Tarp
There is an infinite variety of ways to attach your guylines to your tarp and the easiest is to simply tie them on and leave them there. This has several negatives though, the foremost being the limitations it places on how you set your tarp up.
More often than not, I will run my ridgeline lengthwise between to corners and run a guyline off of each of the remaining two corners. But other times, I’ll run the ridgeline down the center of the tarp and run a guyline off each of the corners.
And there have been times when I went completely freestyle running my ridgeline off at a crazy angle and guylines where ever they worked the best.
The point here is to not permanently attach your guylines to your tarp. You can use a variety of simple knots to quickly attach your guylines including the toggle mentioned above.
The method I use is to simply tie a loop in one end of the guyline (opposite the slider), push the end of this loop through the attachment point in the tarp, then put the guyline through this loop and snug up. It’s fairly quick to remove and provides a stout anchorage to the tarp.
Stakes
Unless you are in very high winds, regular tent stakes should be fine for your tarp setup. I usually carry a few extras, however, to use as toggles or spares since tarp stakes tend to get lost even more easily than tent stakes.
The one place where a standard stake absolutely won’t work is in sand. If you are setting your tarp up at the beach you will either need special sand stakes, or some small sacks that you can fill with sand and bury to provide an anchor point.
If it is particularly windy and you decide to use extra guylines, remember that you will need stakes for those as well.
Tarp Poles
If you only setup your tarp in the woods, chances are you will never need a tarp pole. And if you do, you can probably fashion one out of a large branch.
If however, you are putting together a tarp setup to work with a variety of situations, then purchasing one or two poles would not be a bad idea. For more elaborate freestanding setups or larger tarps, three, four, or even five poles may be ideal.
Because a tarp can be under tremendous load from the tension of guylines, the weight of the tarp, and sudden gusts of wind, tarp poles need to be very stout. Tarp poles tend to fall into two categories: standard and adjustable.
Standard tarp poles, like this Kelty Staff Pole, are collapsible, but when assembled do not allow for any adjustment. For simple setups or where pack weight is an issue, these poles suffice fine.
In some situations, however, you may need a much longer pole or one that you can fine tune the length of. This pair of adjustable poles by Odoland is usually a good deal on Amazon, but check the link to get a current price.
I’m not going to cover setting up a tarp with poles in this article. There are so many crazy configurations and you are only limited by the situation and your creativity. But I will say that even a simple two pole setup in the middle of a field is much easier and quicker with two people.
Directions for Setting Up a Tarp
For this tarp set up example we’ll assume you are using a simple tarp with either grommets or webbing loops and be using a ridgeline that is to be tied to trees.
Suspending the Ridgeline
- Tie a simple loop in one end of your ridgeline and use a stick or tent stake to toggle this end to a tree (or similar object) at the desired height.
- Using a simple half hitch, tie the opposite end of the ridgeline around a tree (or similar object) an appropriate distance from the first and over the area you wish your tarp to cover. When tying the half hitch, I usually make a loop out of standing end of the ridgeline to make the half hitch easier to untie.
Attaching the Tarp to a Ridgeline
- Lay the tarp over the ridgeline either diagonally or lengthwise. If lengthwise, make sure the ridgeline lines up with the center seam of the tarp if there is one.
- With the tarp centered where you want it, use one of the methods mentioned above (toggle, slider, or prusik) to attach one side of the tarp to the ridgeline.
- Pull the tarp taught and repeat for the other side.

Anchoring the Ends of the Tarp
- If you ran your tarp diagonally across the ridgeline, you will only need two guylines. If lengthwise, you will need four.
- Attach all your guylines to the tarp in their appropriate positions.
- One by one, anchor each guyline to a stake or other fixed object and pull the slack out of the guyline with the slider. Don’t tighten yet!
- Once all your guylines are in position, go around and tighten each one. As your tarp setup settles in, you will probably need to go around and retighten them.
Putting It All Together
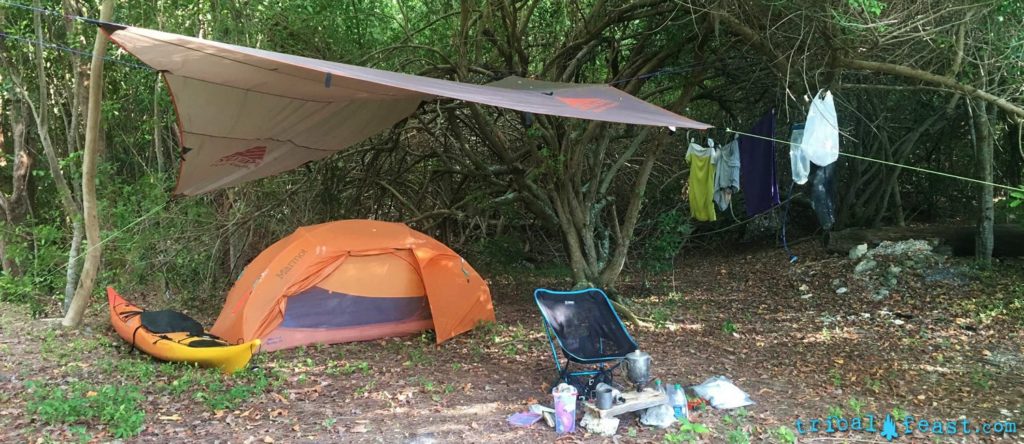
Hopefully, after reading all of this, the off kilter tarp setup at header of this article will start to make sense. It’s one of the tarp setups that I am most proud of, not because it is necessarily good, but rather it was very fast and it stayed tight when a storm blew in, keeping both me and my leaky tent bone dry.
I ran a ridgeline to support the tarp and give me a place to hang clothes beneath it, but I only attached one end of the tarp to the ridgeline since I needed a flatter setup with more surface area. I got a better tarp setup by attaching the opposite end of the tarp to a branch on the same tree the ridgeline ran to. I also ran one of my guylines higher up on a nearby tree rather than a stake to give me a flatter setup.
What’s important here is that you can’t always go by the book when setting up a tarp. You have to look at what is available around you, assess the limitations, and work towards your situational needs. In this case the main limitation was time. A squall was blowing in and I didn’t want to be stuck in my tent.
If I can impart one takeaway here, it would be that once you have an understanding of the basic elements of tarps, you can get creative and improvise for any situation. I promise that once you camp with a tarp sheltering your campsite, you will never go into the woods without one!